
Recently I setup another machine learning machine but this time AMD-based with a W7900 GPU (48GB). I wanted to test the capability of the GPU relative to my other machine learning machine which uses a 12GB NVidia card. Part of my testing involved the use of TensorFlow as I have experience shrinking models and wanted to see if this would significantly speed up the process there.
I didn’t want to have to work at my machine learning machine though as it’s not the more comfortable positioning for long sessions so I opted to setup SSH tunneling for the notebook. This is a quick guide for that process on the AMD ROCM stack.
The first step is to get the W7900 configured with ROCM and the associated libraries. For this machine I set things up with Ubuntu 22.04 LTS, configured SSH via key, and had went through the setup process for ROCM on linux and the associated post installation instructions.
For TensorFlow itself I opted for an older version. I have been using EfficientNetV0 and its more complicated / larger versions as part of my model shrinking and have run into issues with newer versions around saving related to this bug.
In my case I first created a conda environment for machine-learning. I suppose I could have just installed the dependencies with pip but I’ve found conda to be helpful in terms of isolating my environments for various machine learning needs. It’s also nice to be able to start over more easily if the environment gets into a bad state.
wget https://repo.anaconda.com/miniconda/Miniconda3-py38_23.3.1-0-Linux-x86_64.sh
sha256sum Miniconda3-py38_23.3.1-0-Linux-x86_64.sh
After confirming the sha256 signature, install:
bash Miniconda3-py38_23.3.1-0-Linux-x86_64.sh
I then installed TensorFlow and several other dependencies (note I’m using 2.9.2 per that above issue):
conda create -n machine-learning
activate machine-learning
conda install pandas scikit-learn notebook matplotlib
pip install tensorflow-rocm==2.9.2
Next I start a new SSH session with a tunnel setup for port 8888:
ssh -L 8888:localhost:8888 user@192.168.1.100
As long as that SSH session is left open I can use the associated notebook URL as if it were running on my laptop.
As such on subsequent SSH sessions I can run:
conda activate machine-learning
jupyter notebook --no-browser --port=8888 --NotebookApp.allow_origin='https://colab.research.google.com'
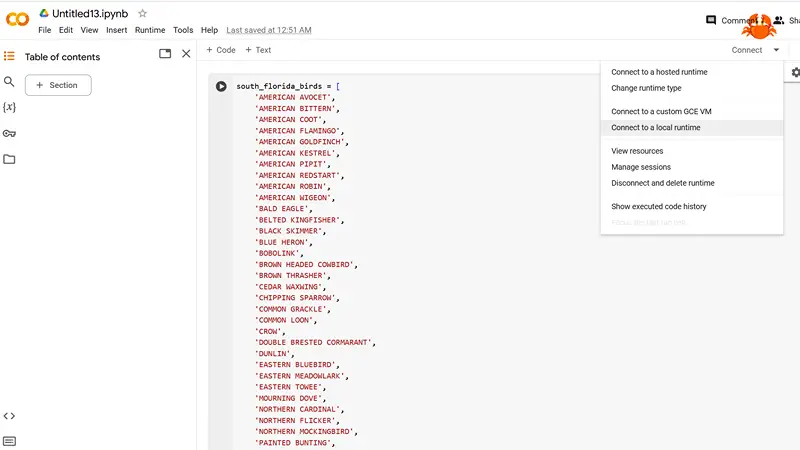
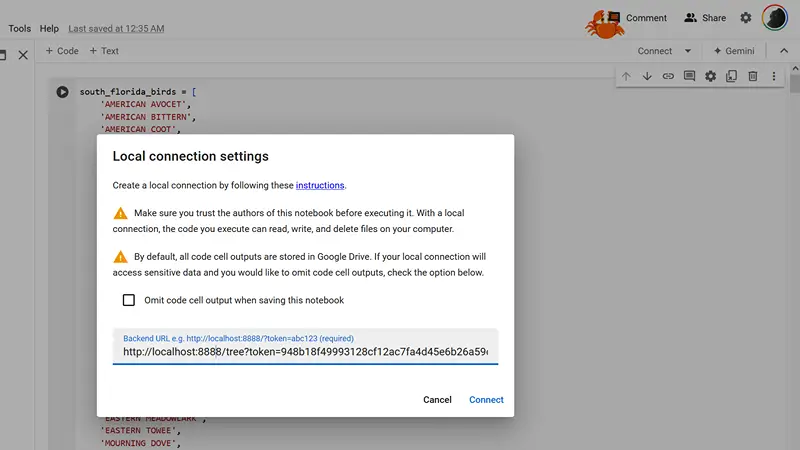
Next you’ll want to take the generated URL, such as the example below, and enter it into the local runtime selection inside of Google colab.
http://localhost:8888/tree?token=94cb1ff48933128cf12ac7fb4745edb26a39c6798fdb923f
With that setup you can now use your machine to setup the notebook and begin running machine learning experiments on it.
You’ll know it’s working if the logs are spammed with the message:
2024-07-07 08:49:17.214980: I tensorflow/core/common_runtime/gpu_fusion_pass.cc:507] ROCm Fusion is enabled.
I did notice one negative of this approach is that my laptop becomes a bit slower in terms of network traffic while this is ongoing. I think given this a hybrid setup works well where I use the SSH tunnel to configure the project, confirm I have the general model setup correct, and then switch over to the machine itself to run the notebook for the training aspect one I can set it and leave it alone for a long period.