Unihiker (affiliate link) is a neat touchscreen capable single board computer from DFRobot. The Unihiker runs a customized version of Debian and provides a “Pinpong” library to interface with the various GPIO.
For this project I’ll be controlling an LED ring, interfacing with the onboard buttons and light sensor, and using i2c to communicate with a HX711 pressure sensor kit from DFRobot.
The code for this project can be found here.
Background
Early on in my hobbyist electronics journey I came across the DFRobot HX711 pressure sensor. It had a micropython library for it and allowed access over i2c so it sounded like a good choice for a little project modifying the code to work with circuit python and getting it working with my Adafruit Clue. With a Unihiker on hand I figured it would be neat to do something similar here.
I had the pleasure of trying out the DFRobot Unihiker as part of the Unihiker trial. Thank you DFRobot for sponsoring this project through the trial program!
Function
The scale is pretty simple once setup:
- Weight: place a weight on the scale to determine its weight in grams
- Calibrate: Press the top button on the right side to calibrate allowing a weight of 50g (configurable) to be used to calibrate the scale
- Peel: Press the bottom button on the right side to peel resetting the current weight to 0g
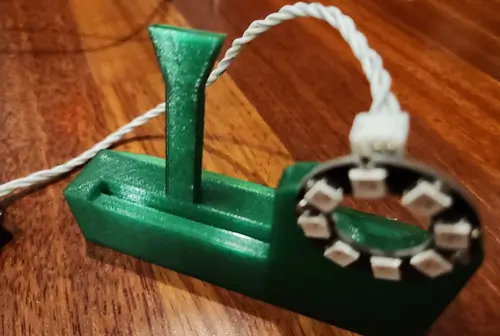
3D Printed Stand
To aid with this project I created a simple 3D printed stand. It has a slot for the micro:bit connector for the Unihiker to slide down into and then a back piece to brace it. I didn’t require any supports to print it and used little infill. Seems to balance fine from my testing. There are 28 mm between the two holes for the LED ring and it uses m2 screws to connect.
Code
Installation
The installation procedure here is to just place both py files at the root of the Unihiker and then access via the run programs UI flow. You’ll need to see the getting started guide to learn how to connect to your device. I use the Visual Studio code SSH option and it works fairly well.
HX711 library
I recall running into some issues with the DFRobot hx711 i2c python implementation (it may have been missing a key initialization step) so I opted to use my logic as the starting point and convert the circuitpython code to pinpong.
You can see the entire library here but I’ve cut out a few key components to highlight the i2c use.
# We import i2c
from pinpong.board import gboard, I2C
# The class initializes i2c on init
class DFRobot_HX711_I2C:
    def __init__(self, board=None, i2c_addr=I2C_ADDR, bus_num=0):
        if isinstance(board, int):
            i2c_addr = board
            board = gboard
        elif board is None:
            board = gboard
        self.i2c_addr = i2c_addr
        self._i2c = I2C(bus_num)
# It writes  and reads from the i2c registers as needed
    def _write_register(self):
        self._i2c.writeto(self.i2c_addr, self.buffer)

    def _read_register(self, length):
        self.rxbuf = self._i2c.readfrom(self.i2c_addr, length)
As such it’s not too difficult to get up and running with i2c and pinpong.
Scale
Like the library I’m selecting key elements to highlight here and you can visit the code to see the rest.
First the logic allows for ENV variables to be set for weight calibration and light enable threshold amounts. I used a 50g weight which I had on hand.
# Weight value
CALIBRATION_WEIGHT_VALUE=50

# Arbitrary value for light sensor to trigger LED ring light
LIGHT_ENABLE_THRESHOLD = 300
The LED ring here is configured with Pin 22 as the one to be used:
NEOPIXEL_PIN = Pin(22)
PIXELS_NUM = 8
neopixel = NeoPixel(NEOPIXEL_PIN, PIXELS_NUM)
For the night light feature I’m using a global variable, here is a set of code associated with that.
LIGHT_ENABLE_THRESHOLD = 300
Board("UNIHIKER").begin()
lightEnabled = None

def handleNightMode():
    global lightEnabled
    lightValue = light.read()
    if 0 <= lightValue < LIGHT_ENABLE_THRESHOLD:
        lightEnabled = True
        for i in range(PIXELS_NUM):
            neopixel[i] = (20, 20, 20)
    elif lightEnabled:
        lightEnabled = False
        for i in range(PIXELS_NUM):
            neopixel[i] = (0, 0, 0)

while True:
    handleNightMode()
When you initialize the board it makes available a set of functionality such as the light sensor. In this case the light sensor value is being read each iteration of the loop and compared to the light sensor threshold previously configured. If the light sensor detects a value beneath the threshold the LEDs are enabled with a value of 20 in each channel. If the light value is over the threshold the LED ring is disabled.
The scale is setup primarily with the following code:
hx711_sensor = DFRobot_HX711_I2C()
hx711_sensor.begin()

# Weight display
weightText = gui.draw_text(text="0.00 g", x=20, y=180, font_size=34, color="teal")

while True:
    ...
    # Update the weight display
    weight = hx711_sensor.weight(10)
    weightText.config(text="{:.2f} g".format(weight))
As you can see it fetches the weight (using 10 iterations to get an average) and then updates the weight text with the new value.
There is also additional logic related to scale features I will discuss in detail next. They are the calibration and peel functionalities of the scale along with the status text indicating if they are active.
By default the status text just indicates it is weighing:
state = gui.draw_text(text="Current State: Weighing", x=30, y=80, font_size=10, color="blue")
In the event it has been updated to something besides this it is setup to realize that and subsequently update it 5 seconds later back to this.
# Track the time when the state was last changed
last_state_change_time = time.time()
initial_state_set = False

while True:
    ...
    # Check and update the state to "Current State: Weighing" if needed
    if not initial_state_set and (time.time() - last_state_change_time) >= 5:
        state.config(text="Current State: Weighing")
        initial_state_set = True
The two elements that can update this status text are the buttons. The former button “A” is used here for calibration while button “B” for the peel.
CALIBRATION_WEIGHT_VALUE=50

while True:
    ...
    # Check if button A is pressed for calibration
    if button_a.is_pressed() == True:
        state.config(text="Current State: Calibrating {}g".format(CALIBRATION_WEIGHT_VALUE))
        last_state_change_time = time.time()
        hx711_sensor.setTriggerWeight(CALIBRATION_WEIGHT_VALUE)
        hx711_sensor.setCalThreshold(1)
        hx711_sensor.enableCalibration()
        i = 0
        while hx711_sensor.peelFlag() != 2:
            time.sleep(1)
            i += 1
            if i >= 7:
                break
        calibration = hx711_sensor.calibration()
        state.config(text="Calibrated: {:.2f}".format(calibration))
        hx711_sensor.setCalibration(calibration)
        last_state_change_time = time.time()
        initial_state_set = False
The calibration logic uses the weight value in grams set as an environment variable. When you press the button the logic uses that environment variable to update the sensor and begins the process of waiting for a weight to be added. Once you add the weight within the time limit it calibrates and updates the UI displaying the calibration value.
while True:
    ...
    # Check if button B is pressed for tare (peel)
    if button_b.is_pressed() == True:
        state.config(text="Current State: Peeled")
        last_state_change_time = time.time()
        hx711_sensor.peel()
        initial_state_set = False
Once the second button is pressed the logic displays it has been peeled and it activates the peel functionality of the sensor.
I’ll write a post about my experiences with the Unihiker but so far they have been mostly good. I wish the documentation was a bit better but I didn’t run into too many blockers and it has been enjoyable to use for the most part.